Illustrated Pasta Guide
- fig & honey

- May 16, 2020
- 5 min read

I'll be honest: I am not a pasta expert. People assume I am because I'm Italian, and while I did grow up making cavatelli with my grandma, I don't actually carry the secrets of my ancestors in my blood. During quarantine when the world suddenly realized they could fill the void of social activity and human connection by making bread, the only flour we could find was tipo 00 from the Italian epicerie across the street. This kind of flour is very fine and high in gluten content, which makes it ideal for pizza and pasta doughs. (This is what the internet told me–again, not in my DNA.)
So once we ran out of our pre-corona stock of flour, I was left with no choice but to buy tipo 00 and make lots and lots of pasta. This led to an unexpected amount of requests to teach friends how to do it, and then to a very silly instagram live tutorial, and now to this step-by-step guide! I follow Samin Nosrat's general measurements for the dough, but you would never catch my grandma measuring flour. It's not an exact science, and it's actually a very simple recipe when you look at the ingredients. I think there are three things that are daunting to people and make them think they can't make pasta: 1) that most recipes call for a pasta machine, 2) that the mixing of the dough looks like some sort of advanced technique, and 3) that you need lots of special equipment and chef finesse to shape it. If any or all of these reasons have stopped you from making homemade fresh pasta, I have good news: none of those things are true!
What stopped me from following other pasta recipes was that I found the writing of the steps very confusing. For me, it is much easier to learn by watching someone else do it, so we thought it would be helpful to create an illustrated step-by-step guide. Below you will find a basic dough recipe as well as three easy shapes: tagliatelle, farfalle, and cavatelli.

Ingredients
Yields 4-6 servings
240 g/2 cups Italian "tipo 00" flour, plus extra for surfaces
5 eggs total: 3 yolks, 2 whole
Semolina flour, for dusting
Special Equipment
Fork
Rolling pin
That's it. Seriously.

Steps
1. Make the flour into a mound, either in a large mixing bowl or on a flat service, depending on how coraggioso you're feeling. If it's your first time, I'd suggest a bowl.
2. Make a well in the center of the mound like a volcano.
3. Pour the eggs and yolks into the crater, and use the fork to beat them and begin incorporating them into the flour. You want to gradually incorporate the flour in a circular motion from the inside out until it starts to come together into a crumbly mass.
A word to the wise: If it is not coming together, you can add another egg yolk, but my advice is to TRUST THE DOUGH. It is not like other kinds of dough used in baking, and it is a crumbly mess until the very last second when it comes together. If you are on your high horse after baking 1 loaf of quarantine bread and think you need more liquid, push that thought away. Trust the dough.

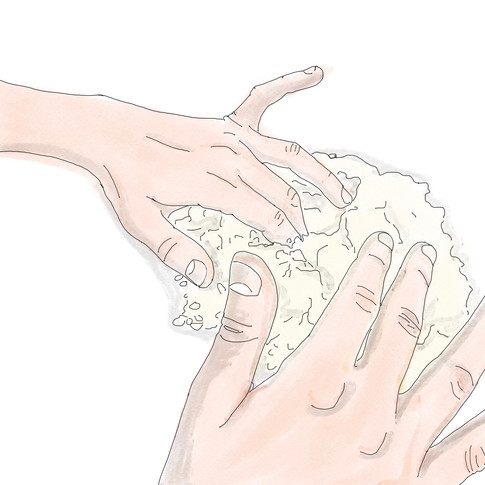


4. Once the flour has been more or less incorporated, you'll need to use your hands to continue mixing it and press in any clumps of flour that didn't come together.
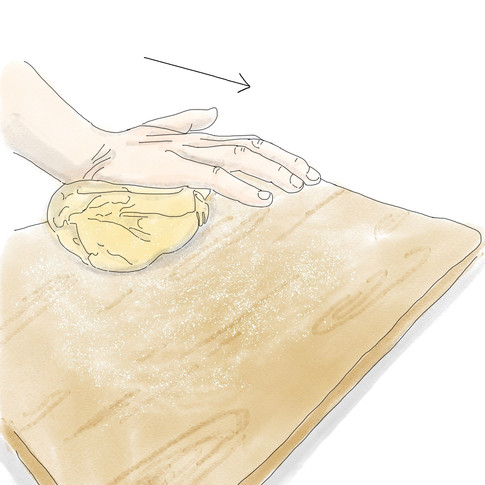
5. Turn it out of the bowl onto a lightly floured surface and knead until it has become smooth and somewhat elastic, about 5 minutes. It will probably still have some cracks in it and feel more crumbly than you expected, and that's ok! Form it into disk as best you can and wrap it tightly in plastic wrap. Let it rest on the countertop (not in the refrigerator) for at least 30 minutes, or up to 4 hours. After resting, the dough should become much smoother and more elastic, and maybe slightly more yellow in color.


Shaping: Tagliatelle, Farfalle & Cavatelli

For tagliatelle, farfalle, and other shapes that require thin dough that gets cut and shaped, proceed with rolling. For cavatelli and other pastas that get shaped more by hand, skip to the shaping step.

6. Cut about a quarter of the dough off of your disk and wrap the rest back up. Dust the countertop generously with flour and shape the dough into a new disk. Flatten it with your hands a bit into an oval shape and begin to roll out into a large rectangle. Check often to make sure it's not sticking to the countertop at all, flipping it over and adding flour as needed.
7. Continue rolling the dough until it is very thin, so that you can see the silhouette of your hand through it when you hold it up. Now you are ready to shape! Prepare a baking sheet with a sheet of parchment paper, and dust it generously with semolina.
Tagliatelle
From the verb tagliare: to cut

1. To make tagliatelle, you will fold it over from one long edge to the other (what we called a "hot dog fold" as opposed to "hamburger" in kindergarten).
2. Sprinkle semolina over everything, and fold the first segment up (about 4 inches, but it doesn't really matter). Continue in the same way, adding semolina in between every new layer, until you've folded all the dough:

3. Bring the flat log in front of you so that the long end is parallel to you. Using a sharp knife, cut into strips from one end to the other, which will unravel to form ribbons. Gently shake them out with your hands and place them into small piles on the baking sheet with more semolina.


Farfalle
You might know these as bowties, but farfalle means butterly
1. Use a pasta cutter wheel if you have one or a sharp knife to cut your rectangle into rows and columns to form smaller rectangles of about 6x4 cm. If you're not sure how big to make them, just picture the store-bought farfalle you eat, imagine them flat, and cut slightly bigger than that. Again, it's not an exact science.


2. Use your fingers to pinch each smaller rectangle inward. I find it easiest to scrunch up the middle first, and then to pinch in the edges.
3. Repeat until all rectangles have been shaped and place on a baking sheet with semolina. The generally keep their shape well if the dough is nice and elastic, so try not to mess with them and overwork the dough too much. If they do seem to be losing their shape, the flour may be too dry and you can try wetting your fingers a tiny bit to pinch them in.
Cavatelli
Comes from cavare, meaning to hollow, because of the hollowed-out center

1. Take small chunk of dough off of your disk, less than the quarter used in the above steps.
2. On a very lightly-floured wooden cutting board, gently roll the dough into a long rope. You can roll it gently between the fingers of your two hands or against the cutting board, but don't press down very hard while you're rolling. You don't want to make it too thin.

3. Using a sharp knife or dough cutter, cut the rope into small pieces about 2 cm in length. I think they look like Cap'n Crunch cereal, but Laur calls them pillows.
4. Using your thumb, press and flick each piece so that it thins and curls in on itself, making a sort of shell.

Cooking
Fresh pasta takes much less time to cook than dried. Prepare whatever sauce you want first and set a big pot of heavily salted water (more salt than for dried since it has less time to absorb) to boil. When you are ready to serve, add the pasta to the water and stir to make sure that nothing sticks together. Let boil for 1-2 minutes or until the pasta rises to the top.
Buon appetito!
If you have any questions, ask us in the comments and we will add clarifying illustrations! xx


Comments